
Your fiddle leaf fig stands by the window as one tall, bare stem with a tuft of leaves at the top, and it looks more like a pole than a tree.
If you want side branches without cutting off the height you have waited for, learning how to notch a fiddle leaf fig is the gentlest place to start.
The short version: Make a small, angled cut about 1/4 inch above a node, going 1/4 to 1/3 of the way through the trunk.
This interrupts the growth hormone flowing down from the top, so the dormant bud below the cut can wake up and form a branch. Do it in spring or early summer, with strong light.
This guide covers timing, tools, the exact cutting technique, notch placement, what to expect afterward, and what to do if no branches appear.
At a Glance
| Factor | What it needs |
|---|---|
| Light | Bright window with some direct morning or late-day sun, or a strong grow light |
| Water | Water when the top 2 inches of soil are dry; keep the routine steady after notching |
| Temperature | 65°F to 80°F, away from radiators, forced-air vents, and cold glass |
| Soil | Chunky, fast-draining mix in a pot with drainage holes |
| Pet safety | Toxic to cats and dogs (ASPCA); the milky sap also irritates skin |
| Difficulty | Easy to perform, but results vary, so notch several nodes |
What Is Notching, and Why Does It Work?
Notching is a small cut into the trunk just above a dormant bud. It works by blocking a hormone that keeps that bud asleep, so the bud gets a chance to grow into a branch.
The Hormone Behind a Single Stem
The growing tip at the top of your fiddle leaf fig produces a hormone called auxin. Auxin travels down the trunk and tells the buds along the stem to stay dormant, which is why many indoor fiddles grow straight up as one stem.
This effect is called apical dominance. The top of the plant gets priority, and the buds lower down wait their turn, sometimes for years.
What the Cut Changes
A notch interrupts the auxin flowing down to the bud directly below the cut. With that signal weakened, the bud can activate and push out new growth.
The rest of the tree stays intact. Your plant keeps its height and its top leaves, which is the main reason people try notching before pruning. All it takes is a clean, sharp utility knife and a pair of gloves.
Where the Dormant Buds Sit
Every place a leaf grows or once grew is a node. On a bare trunk, you will see a horizontal leaf scar, and a tiny dormant bud sits just above that scar.
That bud is your target. The notch goes just above it, never below it.
Tools That Make a Clean Cut
You need a sharp, thin blade so the cut is clean rather than crushed. A single-edge razor blade or a small grafting knife works well, and rubbing alcohol on a cotton pad keeps the blade sanitized between notches.

Kitchen knives and dull craft blades tend to tear the bark. A ragged wound heals more slowly and is more likely to dry out unevenly.
When Is the Best Time to Notch?
Notch in spring to early summer, when your fiddle leaf fig is actively growing. Avoid winter, when growth slows and buds rarely respond.

Why Spring and Early Summer Work Best
Longer days give the plant more energy, and a plant putting out new leaves at the top is a plant ready to push buds along the trunk. In most indoor settings, March through June is the sweet spot.
A good sign is fresh growth at the tip. If your tree has unfurled a new leaf recently, it is in an active phase.
Why Winter Is a Poor Choice
Winter light through a window is weaker and shorter. Forced-air heat and radiators also dry the air, which adds stress to a plant that is already running slowly.
A notch made in December may simply heal over with no branch. You lose a node for nothing and may need to wait months to try again.
Signs Your Tree Is Ready
- New leaves have appeared at the top in the last few weeks
- The trunk is firm and at least about the thickness of a pencil
- Leaves are green and not dropping
- The plant has not been repotted in the past month
If your plant has been stalled for a long time, read up on a fiddle leaf fig not growing before you notch. A stressed tree rarely responds well.
What You Need Before You Start
You need a sharp blade, a way to sanitize it, gloves, paper towels, and strong light for the weeks that follow. The light matters as much as the cut.
Supplies Checklist
- A single-edge razor blade or small grafting knife
- Rubbing alcohol for cleaning the blade
- Disposable gloves
- Paper towels for blotting sap
- An old sheet or newspaper to protect the floor
- A small piece of painter’s tape to mark nodes (optional)
Light Comes First
Buds rarely activate on a tree sitting in dim light. Your fiddle needs a bright window with some direct morning or late-day sun, or a strong grow light, for notching to have a real chance.

An east-facing window within a few feet of the glass is a solid choice in many apartments. A west or south window works too, with a sheer curtain to soften harsh midday or afternoon sun.
If you are unsure your spot is bright enough, this guide on how much light a fiddle leaf fig needs explains what to look for. Darker rooms and north-facing windows usually need supplemental lighting.
A grow light for a fiddle leaf fig can fill that gap, especially if your windows are shaded by nearby buildings. Position it above and slightly to the side of the area you plan to notch.
Healthy Roots and Soil
A tree in soggy, compacted soil puts its energy into survival, not branching. Before you notch, check that water drains freely and the pot has drainage holes.
If the mix has broken down into dense mud, look at the best soil for fiddle leaf fig and plan a repot. Wait about a month after repotting before notching.
Sophia’s tip: Wipe the blade with rubbing alcohol before each notch, not just once at the start. Sap builds up on the edge quickly, and a sticky blade drags through bark instead of slicing cleanly.
How to Notch a Fiddle Leaf Fig Step by Step
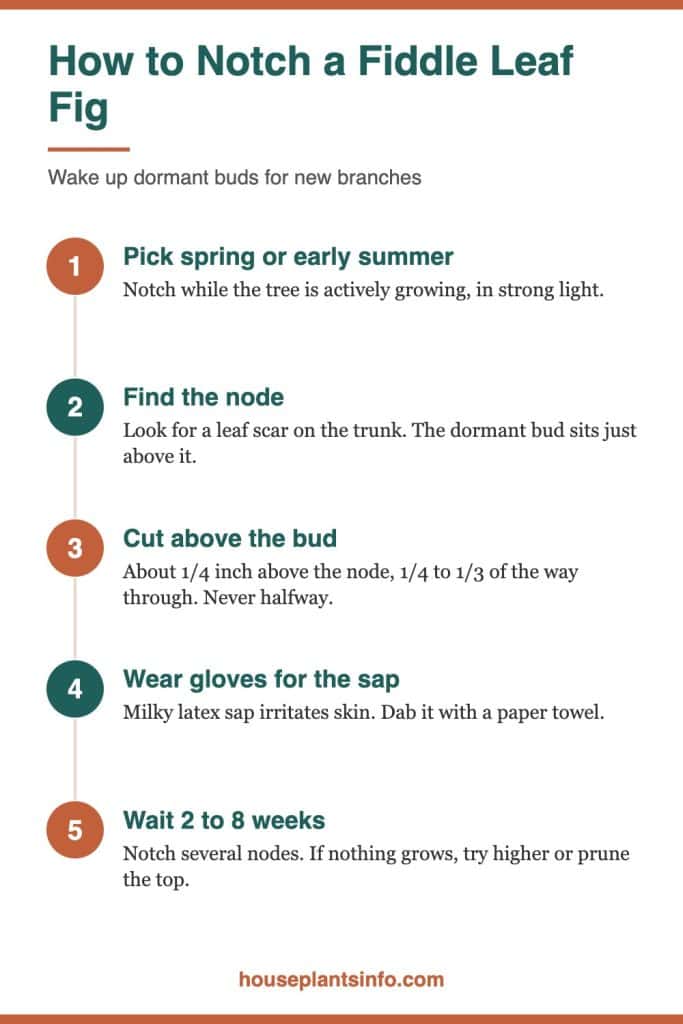
To notch, find a node, make a slightly angled cut about 1/4 inch above it, and go 1/4 to 1/3 of the way through the trunk. Then blot the sap and return the tree to bright light.
Step 1: Protect Yourself and Your Space
Put on gloves and lay down a sheet or newspaper. The milky latex sap that oozes from the cut irritates skin and can stain floors and fabric.
Move pets and kids out of the room while you work. Keep the blade somewhere safe when you set it down.
Step 2: Choose Your Nodes
Look along the bare trunk for leaf scars, the faint horizontal lines where leaves once attached. The dormant bud sits just above each scar.
Pick nodes on the side where you want a branch to grow. Mark each one with a small piece of painter’s tape so you do not lose track.
Step 3: Position the Blade
Place the blade about 1/4 inch above the node, on the side facing the direction you want the branch. Angle it slightly, so the cut tilts downward toward the trunk’s center.
The cut should wrap only part of the way around the trunk. Think of it as a short smile above the bud, not a ring.
Step 4: Make the Cut
Press firmly and smoothly, cutting 1/4 to 1/3 of the way through the trunk. A thicker trunk needs a deeper cut to reach the tissue that carries the hormone, but stay within that range.
Never cut more than halfway through. A deep notch weakens the trunk and can cause the top to snap or wilt.
Step 5: Blot the Sap
White sap will bead up almost immediately. Dab it gently with a paper towel until the flow slows, which usually takes a minute or two.
Do not wipe hard or pack anything into the cut. The wound seals itself as the sap dries.
Step 6: Repeat on Other Nodes
Sanitize your blade and move to the next marked node. Notching several nodes at once improves your odds, since not every notch will sprout.
Space the notches out along the trunk rather than stacking them on neighboring nodes. More on placement follows in the next section.
Step 7: Return the Tree to Strong Light
Put the plant back in its brightest spot, or set your grow light on a consistent daily schedule. Keep it away from heat vents, radiators, and AC drafts.
Water on your normal routine. Do not give extra water to “help” the notches, since soggy soil causes more problems than it solves.
Sophia’s tip: Rotate the tree a quarter turn every week or two after notching. Buds on the side facing away from the window get less light, and even rotation gives every notch a fair chance.
Where to Place Notches for a Fuller Tree
Place notches at different heights and on different sides of the trunk, ideally spiraling around it. This spreads future branches out so the canopy fills in evenly.
Pick the Right Height
Most people want branches starting somewhere in the upper half or upper two-thirds of the trunk, which gives a classic tree shape. Notching very low on a tall plant creates a bushier, shrub-like look.
Stand back and picture the finished tree before you choose. A branch grows from the exact node you notch, so placement shapes the plant for years.
Spiral Around the Trunk
Choose nodes on different sides so branches point in different directions. A loose spiral pattern, moving around the trunk as you go up, balances the canopy.
Avoid putting all your notches on the window side. Branches facing the room fill out the view you actually see every day.
Space Notches Apart
Leave a few inches between notches when possible. Branches that start too close together crowd each other and compete for light.
If you only have nodes close together, notch every other one. You can always notch more next spring.
Notch More Than You Need
Since not every notch sprouts, plan on more cuts than the branches you want. If you hope for three branches, notching four to six nodes is reasonable.
If more buds activate than you like, you can remove extras once they appear. That is easier than waiting another year.
| Goal | Notch placement |
|---|---|
| Classic tree shape | Upper half to upper third of trunk |
| Bushy, shrub look | Lower and middle trunk |
| Balanced canopy | Nodes spiraling around the trunk |
| Fill one bare side | Nodes on the bare side, facing the room |
How Long Until New Branches Appear?
Buds often swell within 2 to 6 weeks after notching. If nothing happens after about 8 weeks, the notch probably did not take.
What to Watch For
The first sign is a small bump just below the cut, often green or reddish. Over the next few weeks, it lengthens and begins to unfurl a tiny leaf.
The notch itself turns brown and dry as it heals. That is normal and does not mean anything went wrong.
What Speeds Things Up
- Strong, steady light for most of the day
- Warm room temperatures, ideally 65°F to 80°F
- Consistent watering, without swings between bone-dry and soggy
- Moderate humidity, especially if your heating is running
Caring for New Branches
Young branches are soft and grow toward light. Keep rotating the tree so they develop evenly instead of all bending to the window.
Hold off on fertilizer changes or repotting until the new growth firms up. Steady conditions help most.
What If Notching Doesn’t Work?
If no buds swell after about 8 weeks, try notching again higher up on the trunk or switch to pruning. Also check light, since dim conditions are the most common reason notches fail.
Common Reasons a Notch Fails
- The cut was too shallow to interrupt the hormone flow
- The notch was made below the node instead of above it
- The tree did not get enough light
- The notch was made during winter or a slow period
- The plant was stressed from repotting, overwatering, or a move
Try Again Higher Up
Auxin is strongest near the top of the plant, and buds closer to the growing tip sometimes respond more readily. A second round of notches a little higher often works when lower ones did not.
You can notch the same node again, slightly deeper, but stay under the halfway limit. Wait until the first cut has dried and sealed.
Fix the Light Before Trying Again
If your tree sits more than a few feet from a window or faces north, move it closer to the glass or add a grow light. Give it a few weeks of better light before the next attempt.
Sophia’s tip: Before you blame the technique, put your phone’s light meter app at the trunk height where you notched. Many trunks sit in far dimmer light than the top leaves, especially beside a windowsill.
Switch to Pruning
Pruning the top, also called topping, is more reliable for branching. The tradeoff is height, since you remove the top of the trunk. A guide to pruning a fiddle leaf fig walks through where and how to cut.
If you would rather keep your tree tall, focus on light and care for a season, then notch again next spring. If height is your main goal, see how to make a fiddle leaf fig grow taller instead.
Notching vs Pruning vs Pinching
Notching keeps your tree’s height but works less reliably. Pruning (topping) is the most reliable way to get branches but shortens the tree, and pinching removes only the newest growth tip.
Notching
You make a partial cut above a dormant bud and leave the top intact. It suits tall trees where you do not want to lose height.
Results vary. Some notches sprout, and some simply heal over.
Pruning or Topping
You cut off the top of the main stem, which removes the main source of auxin. Buds below the cut usually activate, often two or three at once.
This is the dependable choice for branching. It is best when your tree is already taller than you want.
Pinching
You remove only the soft, newest leaf bud at the very tip, usually with clean fingers or small snips. It slightly weakens the top’s hormone signal.
Pinching works best on young, small plants. On a tall trunk, it rarely triggers branches far down.
| Method | Keeps height? | Reliability | Best for |
|---|---|---|---|
| Notching | Yes | Moderate, varies by notch | Tall trees with bare trunks |
| Pruning (topping) | No | High | Trees taller than you want |
| Pinching | Mostly | Low to moderate | Young, small plants |
Pet and Family Safety
The ASPCA lists fiddle leaf fig (Ficus lyrata) as toxic to cats and dogs. Collect cut pieces and sap-soaked paper towels right away, and keep the plant where pets and kids cannot chew on leaves or fresh cuts.
Your Next Steps
- Check your tree for recent new growth at the top before planning any cuts
- Move the plant to your brightest window or set up a grow light a few weeks ahead
- Gather a razor blade, rubbing alcohol, gloves, and paper towels
- Mark four to six nodes at different heights and sides of the trunk
- Notch in spring or early summer, then rotate the tree every week or two
- Check for swelling buds at 2 to 6 weeks, and plan a second round or pruning if nothing appears by 8 weeks
Common Questions About Notching a Fiddle Leaf Fig
Can notching kill a fiddle leaf fig?
A properly made notch will not kill a healthy tree. Problems come from cutting more than halfway through the trunk, which can weaken it enough for the top to wilt or snap. Stay within 1/4 to 1/3 of the trunk’s width.
Should I seal the notch with anything?
No sealant is needed. The milky sap dries and seals the wound on its own within a day or so. Just blot the excess with a paper towel and leave the cut open to the air.
Can I notch a small or young fiddle leaf fig?
You can, as long as the trunk is firm and roughly pencil-thick or larger. Very thin, soft stems are easy to cut too deeply. On young plants, pinching the tip is often a simpler first step.
Do I need to notch every node to get branches?
No, and notching every node can stress the tree. Pick several nodes spread out along the trunk, since not every notch will sprout. Four to six well-placed notches is a reasonable starting point.
Will a notched fiddle leaf fig keep growing taller?
Yes. Notching leaves the top of the tree intact, so the main stem keeps growing upward while side buds develop. That is the main advantage over topping, which stops upward growth at the cut.

Hi! I’m Sophia, and I love plants – especially an expert in growing house plants. I stay in Chicago, United States of America, and through my blog and social media platforms, provide tips and tricks on how to grow healthy, vibrant plants indoors. Check out more here.